Wednesday 30 May 2007

Product Shots: Behind the Scenes

This journal entry is based round a product photo, and some overall shots which show the setup. There were two tricks to this shot which I thought were worth some mention. The first is how I got the gradient colour background from purple to silver, and the second is how I got smooth clean lighting on the screen, without any harsh highlights. So first of all, here's the shot.


The gradient background is actually pretty simple. I got some silver paper which reflects light quite a bit (you can see the reflection of the multimeter at the bottom). The top of the image reflects light in front of the multimeter, and the bottom reflects light above the multimeter. So therefore the colour you want at the bottom should be softly lit from above, and the colour you want the top should be lit from the front. For this reason, I just used the light I was lighting the multimeter with to light the top of the background. I put a softbox in above with a purple gel filter for the bottom part of the image, and the shape of the background paper makes the gradient fill work.

To smoothly light the screen, I needed a soft even source of light in front of the multimeter. To do this, I got two white sheets of foam board to the left and right of the camera angle. Two flashes fired up towards these boards, reflecting and creating the light source. I angled the boards back to drop the light off towards the top of the multimeter, making the screen a bit easier to read.

For a bit of added punch, I used a warming Daylight -> Tungsten conversion filter gel on the flash to the right of the camera, and you can see its given a warm colour to the highlight on the right of the multimeter, and also made the light on the front of the multimeter nice and warm.

So that's all there is to it...pretty simple. Here's some shots of the setup.


Lighting Modifiers: Honeycomb style "snoot"

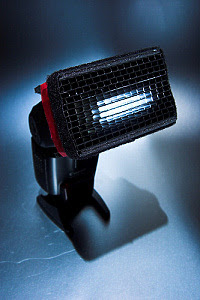
I'd been reading about honeycomb filters being made out of cardboard and correx plastic sheets. I got a hold of a sheet of black correx (I had loads of the stuff, but unfortunately no black) to try it out. I simply cut two strips 4 cm wide across the grain (holes through the correx travelling perpendicular to the cut). I then cut these into sections slightly wider than the flashgun head. I glued them all together in a stack, then using some foamcore board, I made a 6cm top and bottom which I then glued to the correx boards. I then put on some red tape to hold the whole lot together (I don't trust glue fully when things get bumped about) and a line of velcro strip like the flashguns have to let filter gels be attached if necessary. It also serves the dual purpose of backing up the tape in holding the whole lot together. To finish it off, I put one line of the hook velcro strip on the inside where the flashgun sits, so the honeycomb is held firmly onto the flash. With a little twist, the honeycomb easily goes on and off the flash.

Here you can see the honeycomb on the flash viewed from just off axis.


In the following two, you can see in comparison how the light falls off as you come off axis, showing how the honeycomb focusses the light beam.


Here you can see the honeycomb attachment to the flashgun, and also how slim a beam it provides on the background. This is as tight as the beam provided by the longest snoot I have made before, which is about 8 inches long. I find the falloff much more pleasant than a snoot provides. No double shadows which is a definite plus!


While they're not quite as light efficient (all the bits blocking light), they are very space efficient. A long snoot takes a lot of space in comparison to a 6cm by 10cm by 4cm honeycomb. In actual fact, this honeycomb is actually a little too long. Its beam is very very direct. I might well make a shorter version which isn't so direct.

A look inside my kit bags

The type of photography I do most of the time requires I be very mobile, able to take all of it on my back and walk a good distance, and be able to work away from mains power. I don't however want compromises. If I need perfect studio style light at the top of a hill, I want to have it!

Over a period of a couple of years, I've built up a camera and lighting setup which works pretty well for me. It's not complete yet, but funds don't stretch to the things I'd like to add. However, it is an extremely capable setup, given the mobility it allows.

So here's my two kit bags, and my tripod. You can see my camera (Canon 10D with Sigma 15-30 lens) is missing out the left kit bag (due to the fact I wanted to take the photo!)


Camera Bag

Here's a close up on my camera bag (which also contains three of my flashes for my lighting kit)


As with every photographer's bag, there are a lot of odds and ends kicking about in there, but here's pretty much the main stuff


Shown are (starting top left) a beanbag pod, tripod mount for Sigma 70-200 lens, CD case for gel filters, omni-bounce, home-made honeycomb style snoot, ST-E2 infra-red transmitter, 580EX flashgun, 2x 550EX flashguns, and then on the next lot down, a remote shutter release, Sigma 2x teleconverter (with bag above it), Sigma 70-200 f/2.8 EX lens, Canon 50mm f/1.8 lens, Sigma 105mm f/2.8 macro lens and two clamp grips which can allow a flashgun to be clamped anywhere. Not shown are my Canon 10D and Sigma 15-30 lens which was used for taking the photos.

Here's a better closeup of the lenses and cable release.


Flashguns and lighting stuff

Here's the flashguns close up. You can also see a Sigma flashgun on the left, which I don't normally carry, but have available if I think I'll need an extra light, or I'm hooking a light up somewhere it could get broken or stolen (Sigma flashgun is cheaper than Canon ones).


In the CD case, I have gel filters for colour correction and also for just plain colourful images. I keep a daylight -> tungsten, tungsten -> daylight and daylight -> fluorescent set of filters for matching ambient lights. The rest are just colours for cool backgrounds and such like. Here's a colour blue one on a flashgun.


They just have velcro tabs stuck on them so they stick to my flashguns which have velcro round the flash


I have them ordered in the CD case, and labelled. It provides an easy way to keep them clean and flat, while being easy to get at them quickly.


Lighting stand bag and light modifiers


Here's a view of it open


And here's the contents


There are two foldable 5-in-1 reflector/diffusers at the top left, two reflector holders which go on a light stand at the left, two umbrellas with gold/white reversible covers, 1 large light stand, 2x small light stands and one Lastolite Umbrella Box.

Here's one of the reflectors out, with the silver side up


The gold/white reversible umbrellas


And last but not least, the rather terrific umbrella box. It gives much the light quality of a softbox, but with the advantages of an umbrella, making it useful to use with a flashgun.


Thursday 24 May 2007

Using a Ringflash in Product Photography

A ringflash can give a nice clean shadowless look for certain products. Here's a shot with just a ringflash.


Not all that inspiring. The light also falls off towards the top, making the Archos logo text pretty much unreadable. To deal with this, I got a honeycomb snooted flash and directed it just at the top half of the player.


The background in both these shots is very dark, so I got a third flash and fired it at the white background.


Switching on the honeycomb snooted flash, we get quite a moody little product shot.


The final touch is to switch on the ringflash again to fill in the buttons on the bottom half. I also increased the output on the snooted flash by one stop because I thought it was too dark in the previous image.


Here are two photos showing the setup overall.


Advertisement