Sunday, 18 January 2009

Three looks - Two backgrounds - One setup

Sometimes you've got plenty of setup time, but not so much time for shooting. Perhaps, for example, the model is only available for a certain time, and a significant period of that time is taken up by complicated makeup/hair work, or you have a lot of clothing changes to get through, but want a variety of looks for each.

In this particular case, makeup/hair (wig) was pretty long for this shoot, and there were a couple of clothing styles to get through in limited time. So to make sure I could get a variety of looks, I used two half width background rolls slid onto the one full width background support. This meant that I had, in this case, a black and white roll side by side.


So, just by quickly moving lights about, I was able to go from one background to another with little time taken up. And yes, my black roll got some pretty rough treatment getting pulled out...don't ask! Of course, it didn't matter too much. You can see that the black roll is actually used for a blue background.


So by alternating between the white background, black background for a blue gelled look, and shooting across the rolls out into the blackness of the rest of the building, I was able to quickly get three distinct looks.


The only thing I'd say about this method is it puts a fair strain on the background support. Normally a full width roll has its own stiffness, so doesn't want to bend the background support. As you can see though, the two rolls tend to want to put a lot of pressure on the centre of the support bar, because they're split in the middle. Didn't do any long term harm though!

Sunday, 14 December 2008

Pantone Huey Pro


Most of the stuff I talk about on this blog tends to be very much based around the point of capture. Lighting and cameras are a huge part of what I do - I'm very much a believer in getting things right before clicking the shutter button, rather than spending hours fixing hundreds of images in post processing. However, like all photographers, post processing is equally a very time consuming part of the deal.

For a long time I worked happily with monitors I'd calibrated by eye so that they showed something roughly approximating what they should, but I started to work more critically on certain jobs and that was a turning point for me. I needed to know that what I was seeing on my monitor was accurate. Some of the calibration tools out there are unbelievably expensive, so they were ruled out quickly for me. At the other end was the relatively cheap Pantone Huey. Having had a chat with my local camera store, I quickly ruled it out because it only supported a single monitor. No use for calibrating my dual monitor setup.

The next model up was the Pantone Huey Pro, which did offer multiple monitor support, which was the major selling point for myself. In addition, like the Huey, it offers ambient compensation where it controls the screen brightness based on your surroundings. Useful if you have a window nearby which makes the room brighter or darker depending on the time of day.

So, having purchased the Huey Pro, plugged it in and installed the software from the supplied CD, the installed application came up and gave clear instructions throughout. There is one word of warning though: During your first calibration, the software checks to see you can see certain graduations of tone, in order to check that your brightness and contrast are fine. I personally opted to say I couldn't see them properly (even though I could), so that I was given further options to fine tune my brightness and contrast. This gave a much more critical black/white point accuracy.

Other than that, everything is totally self explanatory. When asked you stick the Huey Pro to the monitor with its small suction cups, and the monitor then displays test colours for the Huey Pro to check. My only slight problem is that the first time I hadn't stuck it well enough and it fell off, even though I'd done as suggested and cleaned the screen first. Just to be safe, I then just gently held it against the screen, being careful not to press too hard or the LCD screen can show discolouration. Holding it up against the monitor for the <2 mins the calibration takes really isn't a big hassle.

Having calibrated the screen, you'll likely feel it looks very warm compared to a manually calibrated screen. This is fine, and you get used to it very quickly as your eyes adjust. Try it for a day, and then switch back to the uncorrected colours, and it'll look very blue! It's just a matter of changing what you're used to.

Having done this, you should start to see things very much more clearly. No missing badly cloned areas in the black or white areas, and you have a greater confidence that what you're seeing is right.

Another thing I love about the Huey Pro is the simplicity with which it makes multi-monitor calibration straight forward. Many products would make you pick the monitor in a screen which lists them, but the Huey Pro does the obvious thing - you drag the software to the screen you want to calibrate, and then press the button to start the process. Brilliantly simple!

Since I bought this product, I've noticed a couple of things. The main one is that when you set the screen to update based on ambient light (you can set from 10 secs upwards - I opted for every minute), you'll see the Huey Pro flash its red LEDs and then if the ambient light has changed significantly, you'll see the screen brightness change. On occasion though, the ambient hasn't changed, but you get a small flicker for a fraction of a second where the Huey Pro software seems to remove its colour correction then reapply it very quickly. This may annoy some people, but it's not something that happens all that regularly, and I can't say it worries me much.

It's a well designed product, and unlike many products nowadays, has matching well designed software. I've often said that the best products are ones you use every day, and hardly even think about the fact they exist. The Pantone Huey Pro is a prime example of such a product, and at a very competitive price as well.

Sunday, 23 November 2008

Bringing back the '80s

Sometimes you get a concept and, to be frank and honest about it, you wonder if it's all that great an idea. This shoot was one of those for me. The model wanted to be Debbie Harry (Blondie) for an 80s style shoot. Now I'm seldom one to walk away from a challenge, especially if saturated colours are involved, but lets be honest...most 80s photography has dated quicker than just about any other decade of photography before it!

So I figured a set of photos which looked dated were out of the question, so the only option was to drag 80s style into the 21st century, kicking and screaming. I went on the offensive through google images, youtube etc. looking for all the blondie material I could find, taking specific note of lighting styles. Lots of overly bright hair lights either from above or directly behind were the order of the day. That and excessive use of the clamshell lighting style. Clamshell is simply having two soft light sources, one above the model's face and one below, giving a very even flattering light, and a characteristic double catchlight in the eyes.

So for the first set of shots, I jumped straight in there on the clamshell look. Often in fashion shots, you'll see a high light directly above the camera which gives a very defined fashiony look. So I tried to take a bit of a half measure between full blown clamshell and fashion lighting by using a diffused shoot thru umbrella above modifying the light from a 550EX (equivalent to a 580EX II), while keeping the bottom half of the clamshell lighting a little more subtle by using a silver reflector, which I could control by bringing it up and closer, or down and further away. A single 550EX flashgun (equivalent to a 580EX II) on a boom arm up behind for a hairlight, and we were all set for an 80s feel.

So here's one of the shots from this first setup
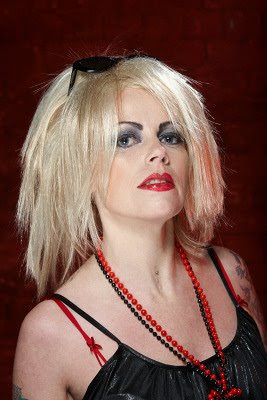


Combined with the smoother more modern digital cleanness of the image, the lighting gives the 80s feel, but without looking dated (hopefully!)

I then opted for another look while the model was having an outfit change. Decided this time to go for a backlit look, with a really saturated colour. When I saw her red top, I tried the red gel on a 550EX (equivalent to a 580EX II) used for the background in the previous shot, but it was way too much, so I stuck another primary colour on in the form of a blue gel which had a lot better impact. The blue light gives a good edge all the way round her, bringing her out from the background well. I didn't really change from the clamshell lighting all that much, but moved it around her. In this case, the umbrella was up above her, but to camera left, while the silver reflector was down level with her arm, and bouncing light back under her chin etc.


Again, hopefully some of that 80s style the model was after, but again without looking dated.

We had a few minutes at the end of the shoot, and I always love a little bit of light relief just before we wrap up. Our makeup artist had seen a photo of Debbie Harry pretending to lick her record, so we decided to make our own version of the shot, and I'd got a Blondie record especially for the idea. Debbie Harry didn't have a tongue piercing as far as I know, but for me, it totally makes this shot. A real attention grabber. That and the kiss on the record...totally love it!


Lighting for that shot was pretty quick and dirty, given we were all wanting to get away. The background was the side of a large white 20ft container, hit hard with a single 550EX flashgun (equivalent to a 580EX II) on the area behind the model and record. Lighting the model was the umbrella from the previous shots, off to camera left, at a steep enough angle to not create nasty highlights on the record but show some texture never the less. Can't remember right off, but I might've reflected a little light back into the models face with a white reflector, but either way, it was only subtle fill if I did. Oh, and the secret of getting the model's tongue so close to the record when she didn't want to risk licking a dirty old record? Bring the record forward...the compression on a long lens means you can't tell it's not in line with her tongue!

Saturday, 25 October 2008

Feathering the light


The shot above is one I took recently. The eagle eyed among you will spot it's a three light setup. You can see the setup in the pic below, albeit without the third background light which I added later with a purple gel about 50 metres down the warehouse. If you're particularly eagle eyed, you'll notice I had the background flash sitting next to the left flash, and it was on but not gelled, so fired as well.


The point of all that was just to save me a lot of setup description - much easier to show a picture. The actual pictures which are of interest for this post use a slightly different setup, but only slightly. You'll see that I moved the umbrellabox round to the left, as our model turned round to face the column.


What you may not have appreciated is the importance that feathering the light played in this photo. I've seen various blogs (particularly David Hobby's Strobist blog) mention feathering the light, often in terms of a bare flashgun. It's hard to do that with a brolly though, because it bounces light pretty widely. However, with a softbox, or in my case an umbrellabox, you have a much greater control of the light.

Here was my first shot after I moved the light from the far side. I just pointed it straight towards her, and when I fired off a shot, I saw the beam reflected an awful lot of light.


So what I was looking for was to light only our model, and not the beam, or not that much anyway. So I turned the umbrellabox round so it faced across in front of her. That meant only the edge of the light was catching the beam, while a bit more was catching our model. The upshot of this was the beam isn't too bright, while the downside is that the light is a bit more contrasty on her face.


Going back to the photo I made after this, you'll see she moved back away from the beam. This means that the beam is in the feathered edge of the light, but the model is moving more into the main patch of light created by the umbrellabox. Not only that, but by moving away from the beam, she's moving to a position where the umbrellabox seems apparently bigger to her, so is softer light.


Think of it in this way - if you turn the umbrellabox to 90 degrees from your model, its effective size is zero square metres, even though it might be 0.8 square metres when pointed at her. By turning it, you're reducing the size, and effectively making a feathering version of a stripbox, which gives a brighter light towards the direction the umbrellabox is pointing.

There are plenty of other uses for feathering light, such as giving a nice vignette look to your images. A softbox or umbrellabox really does make this an easy thing to do.

Saturday, 27 September 2008

A little splash of colour

Often on a location shoot the location isn't everything you'd hope for. It might be absolutely beautiful, with ornate backgrounds, but painted a yuck colour of brown. It might even be a beautiful colour, but ridiculously dark. Either way, it's not just the model you need to think about lighting, but that background as well.

I did a shoot in a bar/restaurant recently which was one of the former - beautifully ornate, stunning location, but dark and dull. There was a balcony area, for example, which had amazing pillars and ornate metal work. The background was tiles which isn't all that bad (nice smooth undistracting background), but it was a sickly coloured green of all colours. There were four dull lights from above giving light in the corridor that the balcony is part of. There was nowhere near enough light to do the shot without flash, and even lit, the sickly green wasn't going to be making any nice shots. Cue the gel filters!

The following is a setup shot for the first set of shots I did with the balcony.


You can see it's a two light setup. I used a yellow gel on a 550EX (equivalent to the Canon 580EX II) which really warmed up that horrible coloured tiling. You can see on the left hand side what the tiles actually looked like. The second flash is a snooted 550EX (equivalent to the Canon 580EX II) fired from the opposite side of the room from the balcony about 6-8 metres away, to provide light on the face of the model. Thanks to Mike for being such a stunning model for this one!

Unfortunately, this young lady kicked him off the balcony for the actual shots.


Another model? Want another style? It's as easy as swapping the coloured gel on the background 550EX flash (equivalent to the Canon 580EX II). 10 secs to change!


Here's another two light setup from the same shoot. This time it was a grand piano which we planned to have the model perch on for some shots. In behind was some remarkable objects attached to the wall. Haven't a clue what they were, but they weren't all that pretty. Jammed in a blue gel on the background light though, and instantly they took on a whole new feel.


Here's one of the shots from this set.


Again, a change of feel to the shots is as easy as a gel filter change!


It's a comforting feeling to know you have the option of turning up at a location, and almost no matter how ugly or dark it is, you can bring new life to a background with a great big splash of colour.

Advertisement