Monday, 30 May 2011

When does a photographer become a blogger/workshopper?

With the uber-elite of photographic blogging becoming ever more attractive to the legions of fans, it got me thinking, are they in danger of losing what their initial appeal was? Lets face it, would anyone listen to them if they hadn't done their fair share of pounding the beat of commercial/journalistic photography?

I've actually just come back to my feedlist after a few days away, and was just a little dismayed to see a person, who's blog used to really be enjoyable, now filling his blog with a line of endless adverts for his workshops. In other words, he's no longer giving details about his photographic jobs. He's moved fully to the other side and, to be frank, is looking to no longer be a photographer any more. He's a workshopper.

Not that I'm getting at them for doing this - everyone needs to find their niche to earn a crust - but just that I think there's a danger that if you stop being a photographer, your blog and your brand can start to go stale. Then again, it could be worse - you could be too busy being a photographer and your blog be as slow as mine! Anyhow...

Tuesday, 22 March 2011

Appropriateness of imagery

Just been having a gander at the strobist site (this entry in particular) and it got me thinking about appropriateness of images.

Note: The following two comments have since disappeared from the site, but they still raise an interesting point

Someone called David (not Hobby) said:

"I think this shot is just awful.

The lighting is far too clever by half and the man looks positively shifty and untrustworthy. It is neither flattering nor interesting

I know it is sacriledge to criticise the sainted strobist, but this is just pants and someone should say so."

This got a highly defensive and sarcastic response from the site author David Hobby:

"Wow, your own work must be TRULY amazing to allow license for that kind of condescending comment. Your photos must make me laugh and cry at the same time. They must speak in several languages at once. I cannot wait to see them."


I find that sometimes photographers, especially those of a strobist persuasion who like to light things, tend to get overly excited about the lighting.

When I personally approach a job, one of my first thoughts is about what the images are trying to say. For example, if I'm shooting a politician, is the end result meant to say that he/she is powerful, strong-willed and in for the long run, or perhaps saying that he/she is welcoming, caring, compassionate and trustworthy?

Having figured out what I'm after, I'll then look at the location, lighting and general styling of the shot to work out how I'm going to shoot it. This is where appropriateness comes in. If I'm after the first option, I might shoot in a dramatic location, make the lighting and post-processing very contrasty, perhaps shoot a lower angle etc. etc.

For the second option, it might be a very much lighter and softer feel, perhaps a shallower depth of field, overall lower contrast feel.

With this in mind, I'm not really saying much about my personal thoughts on the image linked on strobist, but I do feel that the photographer discussing that he wanted to try out a cool idea for lighting and the job allowed him to do so, is somewhat the reverse of the way it should be done.

If anything, I personally think the gridded key light gave a less "holy" feel and a more sinister creepy feel. This isn't to say I dislike the image at all, but I do question the appropriateness of it given this was intended for a local magazine talking about local hospital Chaplains. I'm not so sure that these images would have been a hit with the Chaplains themselves, portraying them in such a dark and moody way.

And as for very defensive photographers, I think we all need to remember that the majority of people who like, or even love our images, are non-photographers, so to suggest that someone who criticises the image must be able to demonstrate their ability to light or photograph better is a bit much. That's like saying that film critics should be able to direct a movie well before they criticise a movie. There may be an argument there, but it certainly doesn't necessarily follow.

Two things that I do agree should be taken from the On Assignment entry though: first that you should always try to come up with a creative and interesting approach to images, no matter how boring the subject, and secondly that testing an idea is very important if you're going to do something a bit off-beat. You don't want to be fiddling trying to get the idea to work while you're on the shoot!

Thursday, 25 November 2010

Black Friday deals

Just thought I'd pass on that Jacobs are having some special deals. If you're in the lookout for any of the kit that happens to be on the specials, it might be a good time to buy. Of course, shop around - just because they say it's a special deal doesn't mean it is the best around!
Jacobs Digital

And for the US folk, there are some deals going too. Koo has done all the hard work, so I don't have to!
black-friday-deals-for-filmmakers

Wednesday, 24 November 2010

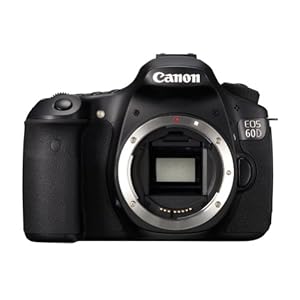
Canon EOS 60D Review

Well I sat around looking back and forth between the Canon 60D and Canon 7D for the last couple of months. With my Canon 40D well on its way towards its advised shutter use of 150,000, I'd felt it was well due an upgrade, making it my backup body.

I'd held out for quite a period for the Canon 60D because I felt the price jump to the Canon 7D wasn't really worth the money if the 60D was going to be an upgrade to the excellent Canon 40D/50D series. But as the launch came closer, it quickly became clear that the 60D wasn't going to be the same breed of camera as its bloodline.

The first difference was the lack of a magnesium alloy body which at first glance sounded like the dreaded "plastic" body. I was quite disheartened at that thought, and was almost ready to purchase a 7D. However, I opted to wait a little while and see what the 60D was like both in online reviews and in my grubby paws.

So having got my paws on one, my instant thought was that it still felt very solid with the aluminium body. It may not have the strength of magnesium alloy, but it still feels a solid camera. I don't plan on flinging it at the ground anyway, so good care and attention is always part of making your equipment last.

Another difference is the flip out screen. I was concerned this was a bit of a gimmick, although my work with video production has me well used to the idea of flip out LCDs. In actual fact, I find that it makes little difference most of the time, and there are occasions where being able to flip the LCD out is very handy. Most importantly, it feels solid and the hinge mechanism doesn't feel flimsy.

Taking a photo, is when I noted a significant difference. The shutter has a more clunky and less controlled sound than the 40D had. This might be reflected in the fact it is only rated to 100,000 shots. It is also significantly louder so if you like a quieter DSLR, this isn't going to hit the spot!

As for image quality, at 18 megapixels I was a little concerned about noise, although I'd heard good things about the 7D, so assumed this wasn't too much of a worry. I haven't really been able to compare like for like with the 40D, because I use Capture One and they haven't yet issued an update for the 60D, but from raw files I've processed with the supplied Canon software, I can say that the detail is absolutely excellent. It has the slight softness that I like, which comes away nicely with a very small touch of sharpening. Anyone used to Canon images will know what I mean.

Low light performance was of significant interest to me, as I often shoot in situations where flash isn't an option. I would say that ISO 3200 is now a valid option for regular use, unlike the 40D where I wouldn't have gone above ISO 800. Roughly speaking, ISO 3200 is the new ISO800 in noise terms from the 40D to the 60D. But given the larger images, I'd say it is actually even a further improvement, because the noise will show even less on a 12x8 print for example, because the pixel count is so much higher now.

But one of the major factors for the 60D is its performance in terms of video work. I can see that the 60D will be one of the new darlings of the video guys. Aside from the obvious - the flip out screen - the quality of video is absolutely excellent with a nice high bit rate. I haven't tested a 7D, but I suspect the quality will be almost as good, even though there are slight file quality differences. Another important factor for some people will be the manual sound level controls which are now featured in the menus. This isn't really an issue for me as I record audio using a Zoom H4n or another video camera, but it is a nice feature to have. Full control over manual settings is excellent to have, and the video mode has a live contrast based autofocus. It works not badly, although you have to be careful in low light. It isn't something you can use while recording though because it changes exposure and has a tendency to seek. That said, if you're recording and want a quick change of focus which will be cut afterwards in editing, that shouldn't be an issue.

For interest, I took it with me to a live dance and singing event which I was recording with the excellent Panasonic AG-HMC151 as a live test and a little bit of a comparison. Focussing is quite hard, but can be done via a monitor plugged into the live feed. This is excellent in standby, but annoyingly it goes to low-res when recording. Trying to do live manual focussing is not something that is made remotely easy. That said, the contrast AF did a reasonable job provided I was careful with it, and the images were pretty sharp even in what was fairly low light (ISO 1600/3200 range).

In terms of quality, I think the image was smoother and less noisy than the Panasonic, but lacked detail in the blacks. I'm going to have to adjust the contrast a little on it to make up for this, but I'm sure it is just a matter of settings. It certainly punches well above its price range, as all the VDSLRs have done so far. If you can accept the limitations of using a DSLR for video work, the quality is more than adequate.

One other thing that I noted was the lack of a sync socket for older flashes. It's a good emergency feature to have, but nowadays with the number of radio trigger and optical trigger options which run off the hotshoe, I think it probably isn't far off time this old system died a death. If it is terribly important, there are also all sorts of adapters available for the hotshoe at relatively low cost.

Like many males with larger hands, I find all the modern dslrs with non-pro bodies a little fiddly and awkward, and the 60D is no exception. I therefore always add an external battery pack, so I purchased a Canon BG-E9 pack which has made a world of difference to the handling of the camera.

In comparison to the pack on the 40D there are a couple of changes. The most noticable is the way you load batteries. The end of the pack at the left hand side (away from the battery connector) has a little lock mechanism which you quarter turn and a drawer slides out which holds the two batteries. This can be replaced with an alternate holder which supports AA batteries. I personally find this a little more fiddly than the back opening to access both batteries because I can't hold the camera with one hand and change batteries with the other. That said, the battery life is another factor of the 60D - I've had the camera a couple of weeks now and only just done a second charge (of two batteries in the grip). That's around 500 images and 1.5 hours of video. I expect the battery performance will improve with a few charges, so I suspect battery life isn't going to be much of a concern!

The other minor detail with the battery pack is the ON/OFF switch for the vertical shutter button. The 40D drove me nuts whenever I went to shoot vertically and it didn't work, because I'd accidentally bumped the small circular ON/OFF switch positioned on the outside of the camera. It is now repositioned to a sliding switch in much the same position as the old battery compartment release switch which means it is almost impossible to knock accidentally. So that's an excellent improvement.

So overall, a bit more clacky on the shutter, and a little strange on the battery grip layout, but in every other way I'd say a vast improvement over the 40D and I assume the 50D given it wasn't a significant change from the 40D. I'm exceptionally pleased with my purchase, so I have no concerns about recommending the Canon 60D.

Tuesday, 6 April 2010

Safe Lighting

If you've read my blog over the years (that's the years I bother to write updates of course!), you'll know how much an advocate of creatively lighting images I am. But sometimes there are jobs which don't allow for this. Broadly speaking there are two types. Firstly, run and gun jobs where you have no setup, and this generally is a damage limitation routine involving on-camera flash, and any off-camera flash or reflectors you can get someone to hold for you. The second type are those where you have all the time in the world to set up, but when the flood gates open, you just have to keep your head above water till the job finishes. This is where safe lighting comes to the fore. You want a setup which is reliable, capable of keeping the pace with the job, and doesn't require you to change anything (or very much) during the shoot - in other words it's a safe setup that you could hand to your granny and she could take great shots. Well, almost!

So I thought for this post, I'd take you through a job I did recently and how I planned for it. The brief was that a makeup (fashion) show was taking place whereby student makeup artists were showing off their work. As part of the assessment, they required to have photos, and they wanted something more professional than quick digital camera snaps. The images were to clearly show hair and makeup, and have the models all wearing white in some form.

So my first questions were the timings of the show, and what time I would have available. The basis of it was the show came in two parts, and I'd have up to 55 makeup looks to photograph between the makeup being finished and the models having to go up on stage. The numbers weren't really stacking up, as even at less than a minute for each model, I'd still be most of an hour photographing that number. We managed to get it sorted out that I'd get more time by spreading out the models over more time, so that I didn't get so many all at once. As it happened, there were less than 55 looks for each of the two parts, so that made it easier.

So in planning my lighting setup, the first thought was to background. I opted for a medium grey, but used one honeycomb light to give it a nice pool of light in behind the model on longer shots, with a slight gradient showing in tight headshots. The grey meant that there was good contrast with the model, whatever hair colour they had, and also good contrast with the outfits. You don't want details being lost in a black background if the hair is being assessed!

Next off was the key light. I decided to go for a large softbox, but to give an even light, I opted to have it on-axis above the camera. I'd sometimes do this just on a normal light stand, and stand very slightly to the side of the light stand to photograph, but in this case I opted for a boom arm. The first advantage was not having to work round a light stand, but secondly that once balanced, the light can be moved up and down with just a light touch. This makes a huge difference to the speed of shooting when you're working with models ranging from 5'2-6'4 one after the other. You'd otherwise have to put the camera down, grip the strobe and undo the light stand, slide it up and then retighten it, before picking up the camera again, only to do it again when you realise you've moved it too much or too little.

On-axis lighting is generally very good for showing up detail, especially with a softbox, but in darker hair, it's important that you have some light to show up the detail, or else all you'll see is a falloff to black. I wanted a good soft even coverage, so a softbox (or octobox as it happened to be) was a reasonable choice. I aimed it across the line where the model would stand, so the model was effectively standing in the edge fall off from the softbox. However, flare was a potential issue, so I opted for the honeycomb style front mesh which prevented the light getting into the camera lens. It's great in this situation, although I'd never use it as a keylight, because the pattern of the mesh makes for some really ugly catch lights in the eyes.

Lastly, a reflector on the opposite side bounced some of the light back into the other side of the model's hair, giving an image with overall even lighting, but enough contrast to make it interesting, and certainly something nicer than just a digital camera shot.

To get the lighting right, I just did the old shoot and chimp routine. Firstly, I set the power on the background light, and fired off a test shot. A slight adjustment, and another test shot got that sorted.


I then did the old shoot the hand to get the light right routine, starting with the key light. I tend to leave my hands slightly darker, because I know you'll get models very pale with makeup sometimes who can end up overexposed. I then switched on the hair light softbox and did a quick test shot, adjusting so that you could hardly see the difference between the light on the front of my hand (key) and the light on the side of my hand (hair light). I then marked the floor with some gaffer tape as a note of the position where the light was right on any model. At the same time, I also taped down all the cabling. The last thing you want with dozens of folk wandering about is people tripping over cables!


I then felt that there was a little too much contrast across the background, so I opted for a wide beam spread honeycomb on the background light.


I can't show any of the photos from the shoot unfortunately, but hopefully it gives you an idea of the thought process behind creating safe lighting for this type of shoot.

One last thing - as much as I'm a fan of battery gear, this is definitely a job for mains powered strobes. You don't have to fear running short no matter how many images you take, you have the power to stop down well for very sharp images and you also have all the advantages of modelling lights, which let you visually see when the model has a nice catch light, and how the light is falling.

Here's a couple of setup shots which should make it easier to visualise everything mentioned above.


Advertisement