Tuesday 28 August 2007

Faking Sunlight

Just a quick entry today. You can sometimes create a bit of visual interest by playing with the colour balance of your flash. A warming (CTO) gel can make the effect of low evening sunlight when your camera is balanced for daylight, or even sometimes "cloudy" white balance.

I had two layers to this photo. The first was the background, which included the sky and the tree. Short of some serious power flash at a ridiculous distance (to keep flashes out of frame), I wasn't going to light the tree. So the tree and sky had to stay relative in brightness. I opted for an exposure which was a little bright on the sky, but still kept some detail in the tree, albeit sufficiently little it's almost a silhouette. This was around 1/200s at f/9, ISO 100.

This left the hay bale with some detail, but still pretty dark in the frame. I firstly set up a flash on the right, warming gel on, pointing at the round face of the bale. Given the exposure at f/9, ISO 100, I was hitting 1/1 power to get it bright enough. It still looked a bit like flash though, so I stuck on a second flash at a lower level, clamped to the light stand. This put some highlights along the grass, and made it look more like sunlight coming through trees.

The last step was a little fill from the left on the outer edge of the bale, which was still too dark a touch. I opted for a un-gelled flash for this to match the colour temperature coming from the sky better, and add to the effect of low sun breaking through the clouds through trees to pick out the bale. I aimed the flash up a touch so it feathered the light on the bale, and didn't light the ground.

The important thing is to make sure you get the "sunlight" flashes to light the ground evenly enough to the edge of the frame so it looks like a very distant light source. Using the double flash helps achieve this look.

The end result, at least to someone not in the know, is what looks like sunlight on the bale.


Here's the three light setup. Pretty simple, but does the trick.

Sunday 26 August 2007

Cheap and cheerful ebay shots with a lightbox

I mentioned using a lightbox I'd bought at maplin in my last post lighting a wristwatch.

This time I want to look at something a little less arty, and a bit less complicated. Suppose you just want a decent quality shot of some stuff you're selling online, such as on ebay, and you feel a cheap lightbox such as the maplin one is worth buying, it can be pretty simple to get some decent images with little money spent.

Normally for my product shots, I use one, two, three or even four off-camera flashes and various diffusers (either on the lightbox or others), light modifiers, reflectors and gobos to get the effect I'm after. Flashes can be pretty expensive, with even an old but decent one with manual controls being £30-50. My latest Canon 580EX was £260, so they aren't cheap.

So I'm going to make a few assumptions here. Firstly that you have a digital camera of some sort (or a film camera and scanner), and that you can set the white balance on it. Secondly that you have some method of supporting the camera for slow shutter speeds, to make sure your images are sharp. If you have a small P&S, this can be one of the little table mounted tripods, although if you have a dslr, you will need something a little more substantial depending on the weight of the camera and lens.

I'm also going to assume you've gone out and bought a small lightbox, and either own or have bought a couple of small desklamps. These lamps have the advantage of being able to flex into almost any position, and are very very cheap. Around £5-10 in Asda, and possibly cheaper elsewhere.

I didn't have much time to put this together, so I took advantage of a high ISO speed and wide aperture to allow me to hand hold the camera. This has given a touch of noise and the shallow depth of field shows, but otherwise the images show the effect of the lighting. At ISO 100 and f/8 (something I'd opt for on a dslr normally using flash), I'd need a shutter speed of around a second using these desklamps, so you can see that a tripod is very important if you want to use a low ISO speed and have sufficient depth of field for your product.

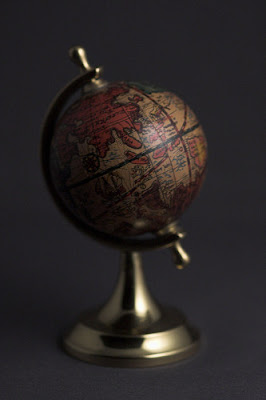
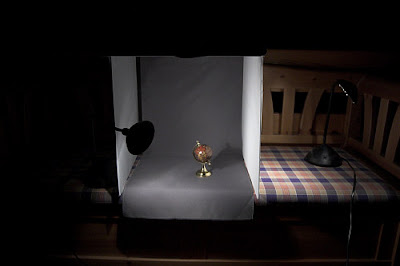
So here's the first shot from my setup.


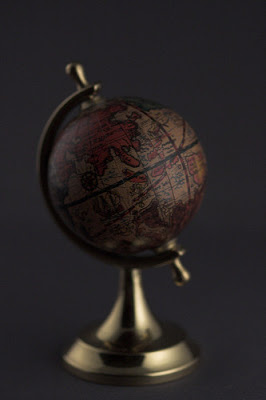
Nothing particularly special. Here's how it was done.


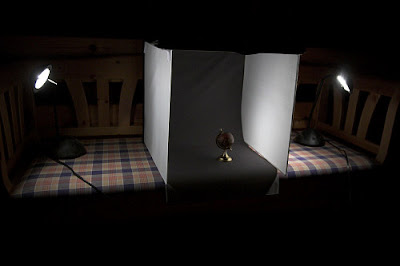
Switching off the left light, you can see the right light provides not only light on the right hand side, but some reflected light from the other side of the lightbox. This is mainly only visible in the shiny base of the globe.


You can see the same with the left light.


Switching off the left light and putting on the right hand light again, you can move the light closer to the diffuser (be careful leaving this too long in case the lamp gets hot - I don't accept responsibility for house fires!) to give a slightly brighter (since the light is closer) and more contrasty (since only part of the diffuser is now lit) light.


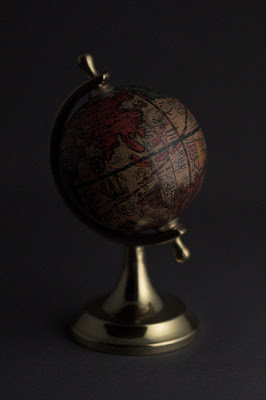
Pulling the right hand light back, switching on the left light and moving the left light in closer and further back, I create quite a pleasing little highlight on the globe.


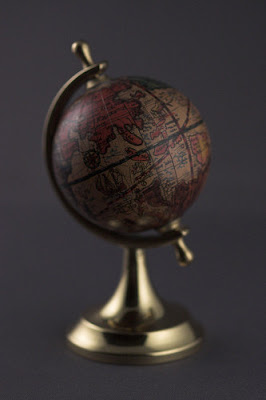
You can see in this shot how the left light creates a very defined area of light on the diffuser, while the right hand diffuser is fairly evenly lit.


Ignoring the difference in distance/brightness of the light, this gives you control of the reflections on shiny items. On non-shiny items, you don't really need to worry about the object highlights...only the shadows on the background.

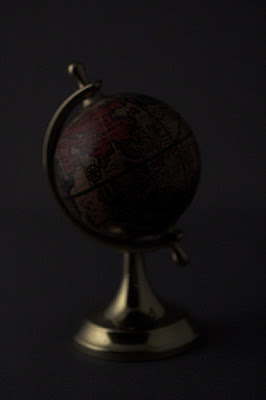
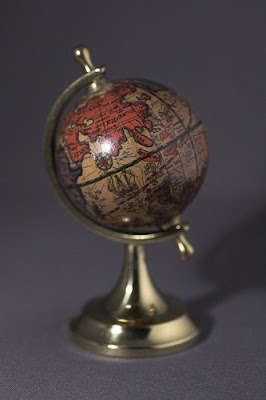
You can see in the following shot, where I did without the diffuser, not only do I get a very harsh set of highlights on the globe, I get a shadow on the background. That said, it does give a nice contrasty shot, and shows the details on the globe. In certain cases, contrasty light can serve you well, such as in bringing out detail, texture and colour in food on plates.


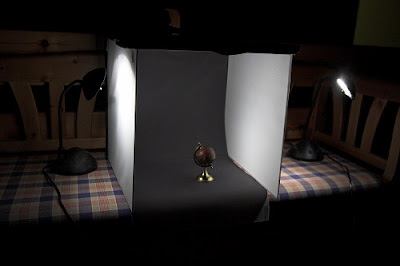
Here's how that shot was done. You can see I just bent the light round the front of the lightbox, while using the right light to fill in the shadows from the left light.


The benefit of this is pretty clear. £20 for the lightbox, £1 for each different colour of background (A2 paper) you want other than the grey/blue background provided, and around £10 for two lamps isn't much to pay for some pretty decent shots of products with little effort.

So what are the downsides? Firstly, you can't control highlights and brightness simultaneously. If I want a contrasty light on the left and a soft diffused light on the right, the right hand light must be further away from the product, and will therefore be darker. If I want the same brightness level, I'm pretty stuck. I either try to darken the left lamp by some method such as Neutral Density filter sheet, or I use more than one lamp on the right to increase the brightness (and the expense on lamps). With flash, you simply move it further away, and set the brightness up a touch.

The second problem is that you need a dark room, which isn't always that practical. If I'd shot this during the day in this particular room (which has no blinds), I'd have had a confusing mixture of white balance between cold daylight and warm tungsten. In some locations, you can't even switch the lights off, such as in some large offices, and often using fluorescent lighting, you'll get a horrible colour cast on your images. Given the long exposure for these lights, you really need very little light coming from elsewhere. With flash, even pretty small bursts will overpower the light in most rooms at the distances we're talking about, so ambient lighting isn't really an issue in your shots.

Everything I've demonstrated can of course be used right off with a couple of flashes and some method of holding them in position such as a lighting stand.

The object of this post is to keep it as simple and cheap as possible, but if you want to go further, either with desk lamps or flashes, try thinking about how you can use added diffusion, reflectors and gobos to control the light further, and create some interesting effects. If you're using desk lamps though, please remember they get hot!

Sunday 12 August 2007

Product Photo: Wristwatch on Black Background

We start with the black base that we're going to have for the image. It's a smooth food preparation mat which I got out of the local supermarket. For speed and simplicity, I have a small light box which cost me £10 (on special deal - normally £20 at maplin - seems to be a deal going on instore). It folds flat for transport/storage, and can be set up in seconds when needed. This too expensive, or awkward to get? Just use the strobist approach for next to free. For convenience though, splashing out is well worth it.

We then add two flashes on either side, both at the same low power (we're just wanting to add highlights, not actually light the watch). They are zoomed in so that they don't fill the entire diffuser, giving a softer edge to the watch highlights.


Nowhere near it, but it's a start. We next add a single flash in behind the watch, to the left hand side. This fires upwards and bounces light off the top diffuser of the light box. It is similarly zoomed in, and relatively low power.


The above image is pretty close, but the light isn't very even. We need to fill in those dark downward shadows to create a more polished look. For small products like this, I have small reflectors made up from foam core board. I have cut them to allow a small piece of foam core board to act as a stand. They can be positioned and angled wherever required. You can see them more closely in the video at the end.


That's the final image. With a bit of photoshop work to take out the light on the bottom black area, a quick curves adjustment and cropping, this is the final product shot.


Here's a couple of setup shots.


Here's the shoot video to see all the stuff in between, and also get a closer look at those little reflectors.

Wednesday 8 August 2007

Product Photo: White Background for Eshop

One of the most standard product photos is the white background shot. Used all over the net on almost every eshop, it provides a clean modern look for any product. However, it can be a tricky shot to pull off, especially if your product is also white!

We start with a white paper background, adding the product, and then adding a flash to light the background.

You will see from the image above, the "reflection" is very diffused. By changing to a smooth piece of board, we get a more defined reflection of the product. We also get a better, brighter reflection from the white background, making it easier to create that smooth white background.

We can see that being backlit, the product is rather dull at the front. We can add in reflectors on either side (just the same shiny board as we used underneath the product) to give some fill light to the front of the product, reflecting light coming from the background. It also helps to smooth out the shadow in front of the speakers.

This looks a fair bit better, but the product could still do with a little more punch. The goal after all is to sell these speakers on an eshop! Adding a second flash at low power gives a touch extra light, which is also more contrasty and directional. Using the zoom function means most of the light is concentrated on the product. Since the background is already going to be white, there's no need to use a snoot.

The flash is a bit too far right, so isn't really getting quite enough light on the front of the product. You can also see that the background flash is a little dark. We're still seeing some detail in the background.

To solve this, the front flash is moved a touch left to make the light fall better on the front of the product. The background flash can be increased in power by 1 stop (I'd probably have opted for 2/3 stop if I was using a 580EX, but it was a 550EX on the background). It's not far off though.

This results in quite a nice image, but the right hand speaker seems a little lost in the white background. By moving the background flash a touch left, the falloff of light on the background can be changed at the right hand side, and the speaker becomes darker (it is reflecting the background), along with the top right of the background.

After a crop and a slight curves adjustment, along with a very quick dodge at the top right to make the background fully white, this image is ready for an eshop.

So that's how a simple white background product shot can be set up, and how controlling the light can allow a white product to be made fully visible.

Here's some shots of the setup:


If you'd like to see all the in-between boring stuff, you can watch the entire shoot for this image. Don't worry if you don't catch all the text in the video... it's basically the same as the text above!

Advertisement